2024. 2. 14. 18:04ㆍIT/Android
<미리 보기>

<소스 코드>
<정리>
BackHandler() - 시스템 뒤로 가기를 정의하는 컴포저블.
@Composable
fun ReplyDetailsScreen(
replyUiState: ReplyUiState,
onBackPressed: () -> Unit,
modifier: Modifier = Modifier
) {
BackHandler {
onBackPressed()//해당 화면에서 시스템 뒤로 가기를 눌렀을 때, 실행되는 함수.
}
...
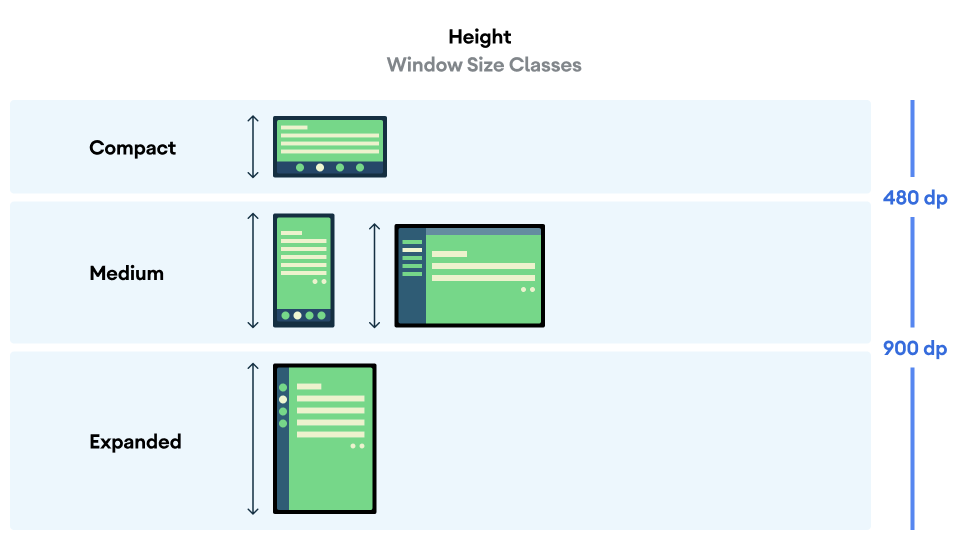
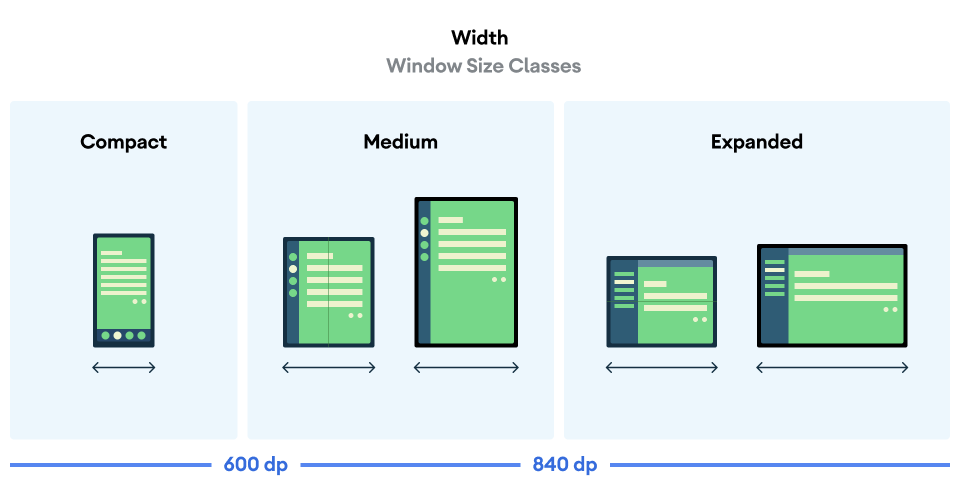
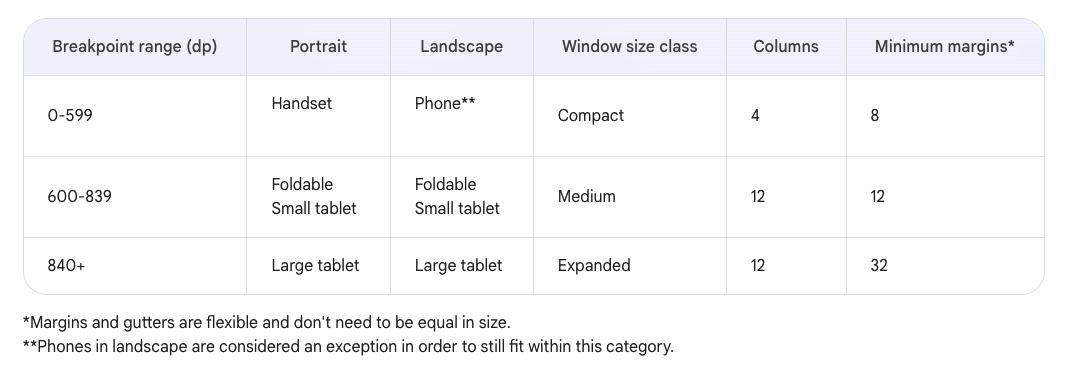
}WindowSizeClass - 화면 크기를 자동으로 계산하는 함수가 포함된 라이브러리로 너비와 높이에 대해 소형(Compact), 중형(Medium), 대형(Expanded) 세 가지 카테고리로 나눠지는데, 화면 크기에 따라 레이아웃 변경이 이루어지는 지점을 중단점(breakpoint)이라고 한다.
class MainActivity : ComponentActivity() {

    @OptIn(ExperimentalMaterial3WindowSizeClassApi::class)
    override fun onCreate(savedInstanceState: Bundle?) {
        super.onCreate(savedInstanceState)

        setContent {
            ReplyTheme {
                Surface {
                    val windowSize = calculateWindowSizeClass(this) //화면 크기를 계산한 WindowSizeClass를 반환.
                    ReplyApp(windowSize.widthSizeClass) //너비 정보를 컴포지션 ReplyApp에 전달.
                }
            }
        }
    }
}

fun ReplyApp(
    windowSize: WindowWidthSizeClass,
    modifier: Modifier = Modifier,
) {
    ...

    when (windowSize) {
        WindowWidthSizeClass.Compact -> { //소형인 경우.
            ...
        }
        WindowWidthSizeClass.Medium -> { //중형인 경우.
            ...
        }
        WindowWidthSizeClass.Expanded -> { //대형인 경우.
            ...
        }
        else -> {
            ...
        }
    }

    ...
}
*스마트 폰의 기본 방향은 세로 모드이지만, 태블릿의 기본 방향은 가로 모드다.
화면 사이즈 별 미리보기 설정 방법.
@Preview(showBackground = true, widthDp = 700) //중형
@Composable
fun ReplyAppMediumPreview() {
    ReplyTheme {
        Surface {
            ReplyApp(windowSize = WindowWidthSizeClass.Medium)
        }
    }
}

@Preview(showBackground = true, widthDp = 1000) //대형
@Composable
fun ReplyAppExpandedPreview() {
    ReplyTheme {
        Surface {
            ReplyApp(windowSize = WindowWidthSizeClass.Expanded)
        }
    }
}
표준 레이아웃(canonical layout) - 일반적인 사용 사례에 근거한 대형 화면 컴포지션으로 Feed, List-detail, Supporting Pain 세 가지카테고리로 나눠진다.
https://m3.material.io/foundations/layout/canonical-layouts/overview
PermanentNavigationDrawer - 영구 탐색 컴포저블.
PermanentDrawerSheet - 영구 탐색 영역을 정의하고 실질적인 구현을 파라미터로 받는다.
PermanentNavigationDrawer( //영구 탐색 레이아웃을 설정하는 컴포저블.
    drawerContent = {
        PermanentDrawerSheet(Modifier.width(dimensionResource(R.dimen.drawer_width))) {
            NavigationDrawerContent( //영구 탐색 메뉴의 실질적인 구현 컴포저블.
                selectedDestination = replyUiState.currentMailbox,
                onTabPressed = onTabPressed,
                navigationItemContentList = navigationItemContentList,
                modifier = Modifier
                    .wrapContentWidth()
                    .fillMaxHeight()
                    .background(MaterialTheme.colorScheme.inverseOnSurface)
                    .padding(dimensionResource(R.dimen.drawer_padding_content))
            )
        }
    },
    modifier = Modifier.testTag(navigationDrawerContentDescription)
) {
    ReplyAppContent( //영구 탐색 메뉴를 제외한 실질적인 컨텐츠 화면 구현 컴포저블.
        navigationType = navigationType,
        contentType = contentType,
        replyUiState = replyUiState,
        onTabPressed = onTabPressed,
        onEmailCardPressed = onEmailCardPressed,
        navigationItemContentList = navigationItemContentList,
        modifier = modifier
    )
}
AnimatedVisibility - 특정 조건에 따라 컴포저블의 출력 유무를 결정할 수 있는 컴포저블.
Row(modifier = modifier.fillMaxSize()) {
    AnimatedVisibility(visible = navigationType == ReplyNavigationType.NAVIGATION_RAIL) { //중형 화면인 경우, 레일 탐색 출력.
        ReplyNavigationRail(
            ...
        )
    }
    Column(
        modifier = Modifier
            .fillMaxSize()
            .background(MaterialTheme.colorScheme.inverseOnSurface)
    ) {
        ...
    }
}
StateRestorationTester - 계측 테스트에서 구성 변경으로 인한 UI상태를 테스트하기 위한 클래스.
class ReplyAppStateRestorationTest {
    @get: Rule
    val composeTestRule = createAndroidComposeRule<ComponentActivity>()

    @Test
    fun expandedDevice_selectedEmailEmailRetained_afterConfigChange() {
        val stateRestorationTester = StateRestorationTester(composeTestRule) //구성 변경으로 인한 UI상태를 테스트하기 위한 클래스.
        stateRestorationTester.setContent { ReplyApp(windowSize = WindowWidthSizeClass.Expanded) }

        composeTestRule.onNodeWithText(
            composeTestRule.activity.getString(LocalEmailsDataProvider.allEmails[2].body)
        ).assertIsDisplayed() //세 번째 이메일이 출력되는지 확인.

        composeTestRule.onNodeWithText(
            composeTestRule.activity.getString(LocalEmailsDataProvider.allEmails[2].subject)
        ).performClick() //세 번째 이메일을 클릭.

        /**
         * onChildren() - 해당 노드의 직계 자식 노드들을 의미한다.
         * assertAny() - 해당 노드를 기준으로 주어진 조건을 만족하는 하위 노드가 존재하는지 확인한다.
         * hasAnyDescendant() - 해당 노드를 기준으로 재귀적으로 모든 하위 노드를 순회하여 조건을 만족하는 노드가 존재하는지 확인한다.
         * hasText() - 직계 자식 노드 중 해당 텍스트를 포함하고 있는 노드를 찾는다.

         = 특정 범위를 두고 어떤 조건을 만족하는 노드가 존재하는지 확인할 수 있는 테스트 코드.
         */
        composeTestRule.onNodeWithTagForStringId(R.string.details_screen).onChildren()
            .assertAny(hasAnyDescendant(hasText(composeTestRule.activity.getString(LocalEmailsDataProvider.allEmails[2].body))))

        stateRestorationTester.emulateSavedInstanceStateRestore() //구성 변경 실행.

        composeTestRule.onNodeWithTagForStringId(R.string.details_screen).onChildren()
            .assertAny(hasAnyDescendant(hasText(composeTestRule.activity.getString(LocalEmailsDataProvider.allEmails[2].body))))
    }
}'IT > Android' 카테고리의 다른 글
| Jetpack Compose - Adaptive App Practice.ver2 (0) | 2024.02.22 |
|---|---|
| Jetpack Compose - Adaptive App Practice (0) | 2024.02.14 |
| Jetpack Compose - Navigation Practice (0) | 2024.02.07 |
| Jetpack Compose - Navigation, Instrumentation Test (2) | 2024.02.07 |
| Jetpack Compose - Architecture(ViewModel) (0) | 2024.02.04 |